
# Using 1search on AWS Cloud
# Overview
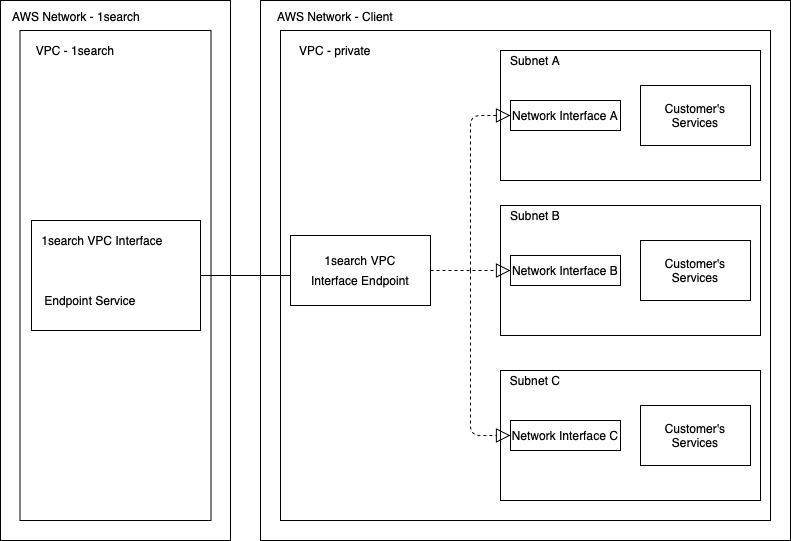
The connection between your AWS VPC and 1search is done via VPC Endpoint Service. It is secure, fast and easy to setup and use in AWS context. The private link is secured by the AWS internal network without the need for any routing, peering or NAT devices. To setup the connection please perform the following steps.
For more information about AWS PrivateLink(including AWS VPC Endpoint and Endpoint Service): https://docs.aws.amazon.com/vpc/latest/privatelink/endpoint-services-overview.html
# Steps
# 1. Get AWS VPC Endpoint Service Name
Each 1search service you created will be provisioned with a dedicated VPC Endpoint Service. Thereby on your end you need the VPC Endpoint Service name to create the corresponding VPC Endpoint to establish the connection.
Go to 1search client portal and login
Select your service from the top right service dropdown list
Switch to
Infratab at left sideNote down the text field
Endpoint Service Name
# 2. Provide AWS ARNs of users who are allowed to create VPC Endpoint
Next we need to grant the permission to create VPC Endpoints from Endpoint Service to AWS principals whom you permit.
Note
Make sure you finish this step before entering the next, otherwise you will get the error Service name not found. in the next step.
At the same page as the previous step, click the
EditbuttonIn the
Principalstext field, input the AWS arns of those you allow to create VPC endpoints. You can specify multiple arns separated by a newlineExamples:
arn:aws:iam::123456789:rootAllow all principals in aws account 123456789arn:aws:iam::123456789:user/batmanAllow only userbatmanin account 123456789arn:aws:iam::123456789:role/jenkinsAllow only rolejenkinsin account 123456789
Click the
Updatebutton to save changes
# 3. Create VPC Endpoint in your AWS VPC
Note
Make sure you've finished previous step before starting this step. Allowed list change may need a minute to take effect.
Login to your AWS console and go to the VPC panel
Go to the
Endpointspanel from left side barClick
Create EndpointSelect
Find service by namefromService categorylistInput the previously noted
Endpoint Service Nameand click VerifyIf you skipped the last step you will get a
Service name not found.error message.If you just finished last step please allow 5 minutes to let your change take effects
Select the VPC you are trying to connect to 1search from from the
VPClistSelect the Availability Zone and choose private subnet ID for each. You can only select one subnet for each Availability Zone
Select or create a security group from
Security group. Make sure you allow HTTP port80and25001for 1search queries and upsertsClick
Create Endpointto finish
# 4. Register newly created VPC Endpoint DNS names
After creating the VPC Endpoint between your VPC and 1search, your newly created VPC Endpoint will automatically generate numerous DNS names(1 defualt + 1 * number of Avilability Zones) which need to be allowed in 1search.
Select your newly created VPC Endpoint and a description panel should expand in the button of the page
In
Details - DNS names, note down only DNS names and ignore the ending string in the bracketsExample:
vpce-0b173aa29bbbf4818-nf47zpcn.vpce-svc-059717999f199f23f.ap-southeast-2.vpce.amazonaws.com
vpce-0b173aa29bbbf4818-nf47zpcn-ap-southeast-2c.vpce-svc-059717999f199f23f.ap-southeast-2.vpce.amazonaws.com
vpce-0b173aa29bbbf4818-nf47zpcn-ap-southeast-2a.vpce-svc-059717999f199f23f.ap-southeast-2.vpce.amazonaws.com
vpce-0b173aa29bbbf4818-nf47zpcn-ap-southeast-2b.vpce-svc-059717999f199f23f.ap-southeast-2.vpce.amazonaws.com
Go to the previously opened 1search client portal page, make sure you select the right service and that you are in the
InfratabClick
EditbuttonIn
Endpointstext field, put in your noted DNS names, separated by newlineClick the
Updatebutton to save the changesYou can also create an A record to your all-region VPCE (i.e. the one without region specified) to have a user-friendly DNS name. After creating the alias record, remember to also register it as an "Endpoint" via our portal. e.g:
VPCE: http://vpce-0af37dd5642cb2f7b-n5aft84d-us-west-2a.vpce-svc-0b19f6a91b1fceb2f.us-west-2.vpce.amazonaws.com/

A Record alias: bookshop.mydomain.net
- At this point, you should be able to access 1search via a user-friendly DNS name such as bookshop.mydomain.net in the example above just like how you would normally access resources in your private subnet.